Ready to record a AMEB Piano video exam? Whether you’re the performer or helping your child with their performance, recording an AMEB piano video exam requires a bit of careful prep. Unlike academic exams, AMEB piano exams are not only about meeting skill requirements, but also delivering a great performance too. So with over a decade of experience with AMEB exams, I’ll share my personal tips for delivering an A+ recording.
1. Read the AMEB Guidelines
Before you rush off to get any fancy recording gadgets, have a quick read of the AMEB Victoria’s guidelines for video exams.
Essentially, the video exam is as an in-person would be, with the camera being the stand-in for the examiner. In that case, the recording would follow as close as possible as what would be at their examination rooms.
In particular, there’s a requirement for digital or acoustic pianos for the exam recording. ‘Piano for Leisure’ students can play on a digital piano for any level, but ‘Piano’ candidates can only play on a digital piano for Preliminary to Grade 4 exams only. Higher grades (grades 5 and onwards) must play on an acoustic piano.
Digital pianos must also have 88 weighted keys, and fixed pedals such as on an acoustic piano.
There’s also a requirement for exams to be supervised by an adult (such as a parent, guardian or teacher). But as it would be for an in-person exam, the supervising adult can’t interact with the performer and should not adjust the camera.
2. Use a phone or laptop to record
The recording needs to be in a horizontal view (landscape mode).
I like using a smartphone or a laptop because they generally have better microphones than tablets or digital cameras.
Other than this, I don’t recommend using any fancier recording equipment. I’ve experimented with using better microphones, but the extra hassle and cables and mic stands and time to connect everything really detracts from the main goal of performing the exam pieces.
Plus, even an older model iPhone has hi-def 4k video recording! So just grab a device and get recording.
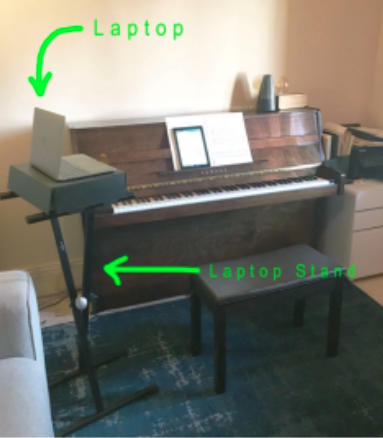
3. Place your recording device up high
If the player is sitting facing the piano, the camera should sit at their 8oclock or 4oclock mark, to the side and a bit behind them.
The camera should also be propped up higher than the player. I like using a phone on its side with a tripod, or a laptop elevated on a stack of milk crates or boxes.
The camera view should show all the entire width of the piano keyboard and see the player’s hands and face.
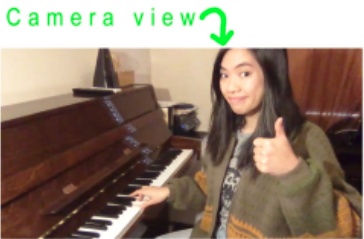
For grades 5 and higher, the camera needs to be zoomed out enough to see the player’s feet too.
Once recording starts, the camera should be left where it is. That means no camera movements or zooming in and out. So take the time to make sure the camera-view is suitable.
4. Turn off all notifications
Put your phone in airplane mode or Do Not Disturb mode (turn off vibration alerts too) or on your laptop switch off notifications, wifi and Bluetooth while recording.
There is nothing worse than playing a brilliant take that’s interrupted by dings or buzzes from notifications.
Also consider if your device is connected elsewhere (think shared AirPods or alerts that pop up across phones and laptops). And disable all these notifications too.
5. Print out the intro script
At the start of the recording. performers must introduce their name, today’s date, their instrument and grade, as well as the title of the first piece clearly to the camera. Before each subsequent piece too, they must announce the title of the song before playing it.
The AMEB provides an outline for the script here.
It can be hard to remember all the details, and awkward to read the script to camera. So I like to print out the script and tape it up near the camera like a cue card or teleprompter. This way, the performer can look towards the camera while speaking and remember what they need to say too.
6. Do a sound check
Do a RECORDED sound check. Consider the loudest song and the softest song in the repertoire. Hit record and play the loudest section, and play the softest section. Then play it back and listen for any clips or echoes.
If the audio is clipping (it’s a buzzing sound), go to Audio Settings and turn your mic volume down.
If the recording is echoey, washy or boomy (like there’s no clarity in the sound despite sounding ok in the room), you can try hanging some acoustic boards or towels around your camera (about 10-20cm away from the camera).
7. Perform in one continuous take
For an AMEB piano video exam, the entire performance must be recorded as one continuous take. But unlike in-person exams, players have the benefit of doing multiple takes and selecting the best one to submit.
My favoured approach is to commit to playing the entire performance once first, start to end, no stops, regardless of errors or mistakes. As opposed to starting and then stopping the recording when a “big mistake” happens, and restarting again.
There are a few reasons; firstly it helps to build stamina for the longer performance. Second, and more importantly, it takes the pressure and focus off getting it “perfect” (and the negative feedback in stopping and starting again).
Instead, do your best in one take and see how it goes. And after this first recording, WATCH IT BACK.
It may feel cringey to watch, but this is super valuable feedback for performers. It may sound “not as bad” as expected, or it may highlight gaps that they didn’t realise existed.
I often find when students watch back their recordings, their “big mistakes” don’t sound as big as they initially thought.
After that, if another recording is needed, then repeat the process of playing the whole performance and watching it back.
Ready to try a piano lesson?
8. “Exaggerate” your dynamic range
A tip taken from film and theatre, is that gestures and tone on camera and onstage often appear “flatter” compared to what we’d normally experience in daily life.
For example, to see a hand-wave on stage, an actor needs to do an unusually big wave for the movement to be seen by the audience. When speaking, an actor needs to project a quiet conversation much louder than expected in order for the audience to hear it.
Much is true when recording an AMEB piano video exam. Big forte-to-piano dynamic changes heard in the practice room can sometimes sound like a tiny blip on a recording. Therefore performers need to consider what their dynamics and expression sounds like on the recording. Even if it already sounds big in person, you may need to exaggerate a bit further to be able to hear it on camera.
Again, as per tip #7, listen back to your recordings to get a real gauge of how your dynamics are sounding.
It’s not about a “perfect” take, but a great overall performance
Uniquely, unlike academic exams, AMEB piano exams are performance exams. As well as skills like scales, notes, and technique, performers are also marked on musicality, expression, style and interpretation. Therefore, a lively expressive performance with a few bung notes is going to fare better than a stiff note-accurate performance.
Plus, I like to remind my students that AMEB examiners are also music lovers! Being players and performers themselves, they appreciate a fun musical performance at any level.
So take the pressure of needing to get every note right. Instead, put the focus and favour on a great performance, even if a few bung notes slip in along the way.
All the best with your AMEB piano video exam submission!
About the piano teacher
Michelle is a freelance pianist and piano teacher who aspires to make music fun and accessible for anyone who wants to play. She’s been playing and teaching piano to kids and adults for over a decade, and brings good vibes playing piano for weddings and events at Michelle Plays Piano.
Michelle also plays drums in post-punk and indie bands around Melbourne, and has written about bands for The Music and EARMILK. When she’s not obsessing over music, she’s probably thinking about food.